Build a Stable Gaming PC in 2026: Motherboards, PSUs, Cooling & Cases Explained
This PC motherboard PSU cooling case guide 2026 explains how each core component affects gaming performance, stability, and long-term reliability. Most gamers spend weeks agonizing over which GPU or CPU to buy. Then they pick the first motherboard that looks compatible, grab a PSU because the wattage sounds right, and choose a case because the RGB is nice.
That’s how you end up with an expensive system that throttles, crashes, runs hot, or chews through components in two years.
The GPU and CPU decide your gaming performance. But the motherboard, PSU, cooling, and case decide whether that performance actually shows up consistently, quietly, and long term.
This guide cuts through the marketing noise on all four. By the end, you’ll know exactly what to buy, what to skip, and why.
This guide is for you if:
- You’re building or upgrading a gaming PC in 2026
- You want to know how much motherboard, PSU, or cooling you actually need
- You keep seeing confusing terms like VRMs, 80 Plus Gold, or PCIe lanes
- You want a system that stays stable and cool without overpaying
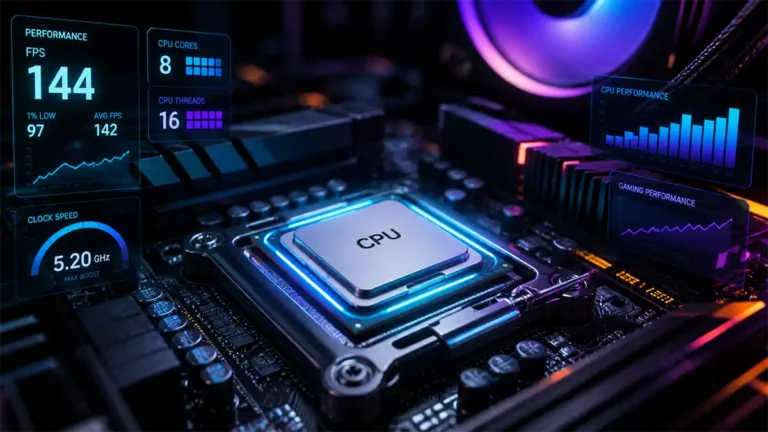
Part 1: Motherboards — What Actually Matters
What Does a Motherboard Actually Do?
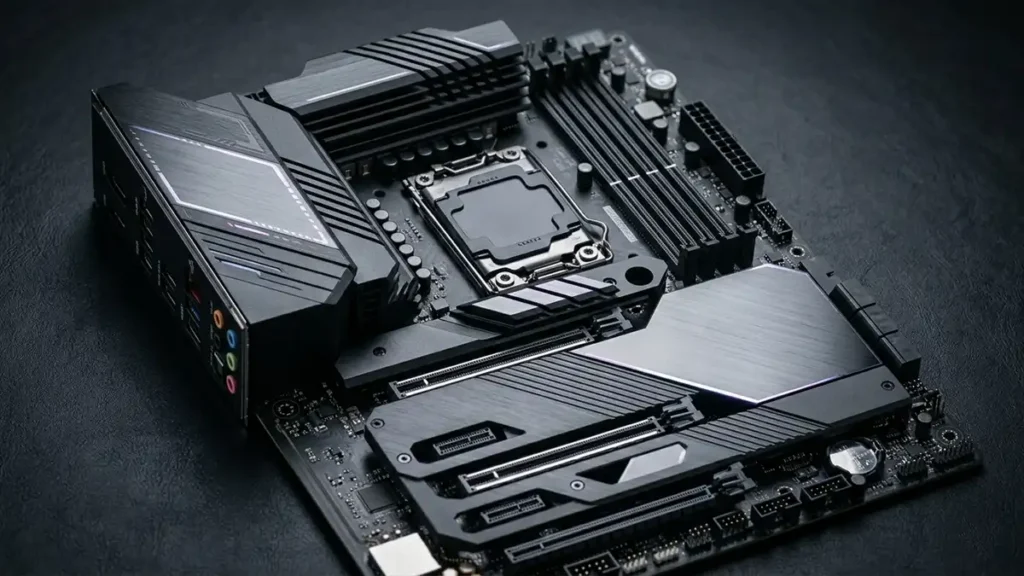
The motherboard is the backbone of your entire PC. Every component plugs into it: CPU, GPU, RAM, SSDs, cooling, USB devices, networking, and audio.
It doesn’t generate performance on its own. It’s the platform that lets everything else work together properly.
Here’s the thing most people get wrong: a more expensive motherboard will not increase your FPS. The CPU and GPU determine almost all of your gaming performance. The motherboard determines whether that hardware runs stably, at the right speeds, with room to grow.
A good motherboard gives you:
- Correct CPU support and compatibility
- Stable power delivery to the CPU
- Enough storage and USB connectivity
- Memory that runs at full advertised speeds
- A foundation for future upgrades
A bad motherboard gives you instability, throttling, and headaches.
CPU Socket and Chipset: The Compatibility Check You Cannot Skip
Before anything else, the motherboard must physically support your CPU. That’s the socket.
Current sockets in 2026:
| Platform | Socket | Notes |
|---|---|---|
| AMD (Ryzen 7000/9000) | AM5 | Current AMD platform, future-ready |
| Intel (Core Ultra 200 series) | LGA1851 | Current Intel platform |
Get this wrong and the CPU literally won’t fit. There’s no workaround.
The chipset is the second layer of compatibility. It controls what the board can actually do, overclocking support, USB ports, PCIe lanes, storage options, and memory tuning.
Current chipset tiers (2026):
| Tier | AMD | Intel | Best For |
|---|---|---|---|
| Entry | A620 | B760 | Budget builds, basic gaming |
| Midrange | B650 / X670 | B860 / Z790 | Most gamers — best value |
| Enthusiast | X870 / X870E | Z890 | Overclockers, heavy workstation use |
The honest answer for most gamers: a midrange chipset board is all you need. You get solid connectivity, enough storage options, decent power delivery, and good BIOS features without paying for overclocking capabilities or professional features you’ll never touch.
BIOS Compatibility: The Step Everyone Forgets
Even when the socket matches, a motherboard may need a BIOS update before it can run a newer CPU. This is especially common during early hardware launches.
BIOS Flashback is a feature on many boards that lets you update the BIOS without having a CPU installed first. If you’re building with a brand-new CPU on an older board, this feature saves you from a frustrating dead-end situation. Look for it.
Forgetting to check BIOS compatibility is one of the most common first-build mistakes.
VRMs: The Part Nobody Talks About Until Something Goes Wrong
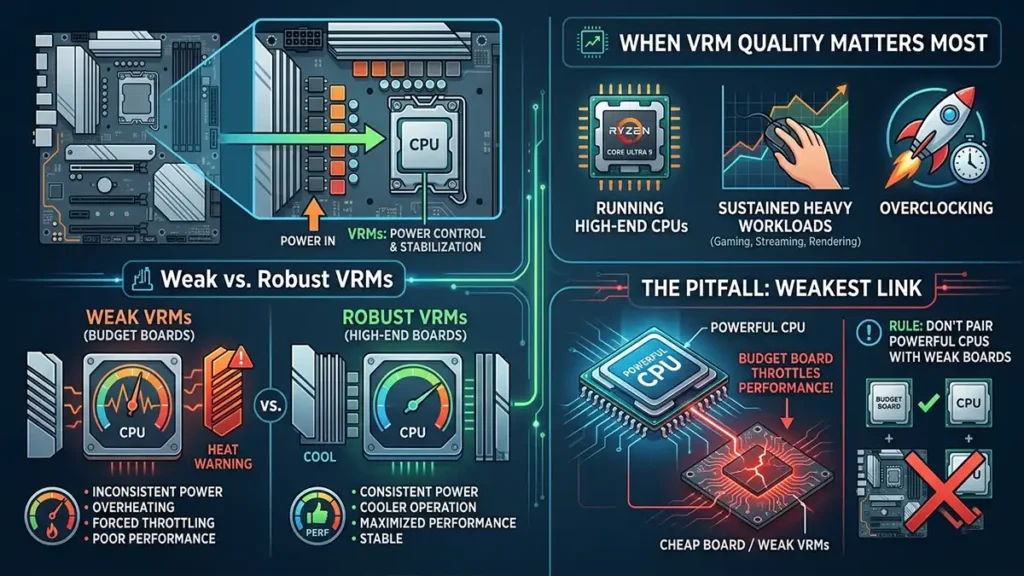
VRMs (Voltage Regulator Modules) control and stabilize the power going to your CPU. Every board has them. Most budget boards have weak ones.
Think of VRMs like a water pressure regulator. The CPU demands consistent, clean power, especially during heavy loads. Weak VRMs deliver inconsistent power, overheat, and force the CPU to pull back its performance (thermal throttling) to protect itself.
VRM quality matters most when:
- You’re running a high-end CPU like a Ryzen 9 or Core Ultra 9
- You’re doing sustained heavy workloads (gaming for hours, streaming, rendering)
- You’re overclocking
For budget and mid-range CPUs, most midrange-chipset boards have adequate VRMs. Where people get burned is pairing a cheap budget board with a powerful CPU to save money. The board becomes the weakest link.
Rule of thumb: don’t cheap out on the board when you’re spending on a powerful CPU.
RAM: Compatibility Is More Complicated Than It Looks
Motherboards support either DDR4 or DDR5. These are not interchangeable. Buying the wrong memory generation means it literally won’t fit.
Beyond the physical slot, two things matter:
1. Supported speeds: Every board has a maximum rated memory speed. Running RAM faster than the board officially supports requires XMP/EXPO profiles — and even then, not all kits are fully stable on all boards. Check the board’s QVL (qualified vendor list) if memory stability matters to you.
2. Slot count: Most gaming boards have 4 RAM slots. Some budget boards only have 2. Four slots gives you upgrade flexibility. Two slots means you’re maxed out once they’re full.
Storage: M.2 Slots and the Lane-Sharing Problem
Modern gaming systems run on NVMe SSDs. Fast, silent, and physically tiny. But the motherboard controls how many you can use and at what speeds.
What to check:
- Number of M.2 slots: Most mid-range boards offer 2–4. One is the bare minimum for a gaming system, two is comfortable.
- PCIe generation: PCIe 4.0 and 5.0 drives exist. PCIe 5.0 slots on the board let you use the fastest available SSDs.
- SSD heatsinks: Boards with built-in M.2 heatsinks help keep drives cool during sustained use.
There’s a hidden catch almost nobody warns beginners about: lane sharing. Many boards share bandwidth between slots. Filling a second M.2 slot can sometimes disable a SATA port or reduce bandwidth on another slot. It’s in the manual, buried in the fine print.
If you’re planning a multi-drive setup, check the manual before you buy the board.
Rear I/O: The Ports You’ll Use Every Day
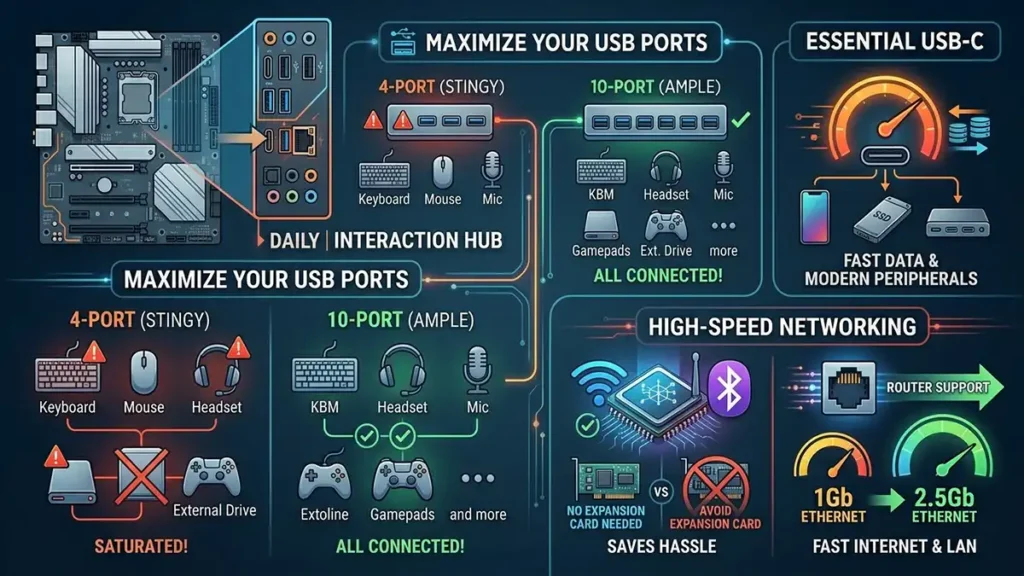
This is easy to overlook during spec comparisons, but rear I/O is what you interact with daily.
What actually matters:
- USB port count: Budget boards can be surprisingly stingy. A gaming setup with a headset, keyboard, mouse, controller, microphone, and external drives can easily saturate a 4-port rear I/O.
- USB-C support: Increasingly important for modern peripherals and fast data transfers.
- Built-in Wi-Fi and Bluetooth: Saves you the hassle of adding a PCIe expansion card later. If you’re not wired, buy a board with this included.
- Ethernet speed: 2.5Gb Ethernet is now common on mid-range boards. Worth having if your router supports it.
Form Factor: Size Has Trade-Offs
| Form Factor | Size | Best For | Trade-Offs |
|---|---|---|---|
| ATX | Full size | Most builds | None — most flexible |
| Micro-ATX | Smaller | Compact gaming PCs | Fewer slots, sometimes fewer ports |
| Mini-ITX | Very small | Small form factor builds | Very limited expansion, tight thermals |
None of these are “worse”, they serve different builds. But always verify your case supports the form factor before ordering.
What Gamers Should Prioritize in a Motherboard
Common Motherboard Mistakes
Buying the wrong socket. Still happens all the time. Double check before ordering.
Ignoring BIOS compatibility. A physically compatible board may not boot a new CPU without a firmware update.
Pairing cheap VRMs with a powerful CPU. The board becomes the throttle point.
Forgetting case compatibility. An ATX board will not fit in a Micro-ATX case.
Overspending on enthusiast features you’ll never use. Most gamers are perfectly served by a quality midrange board.
Part 2: PSUs — The Component That Protects Everything Else
What a PSU Actually Does (and Why It Matters More Than You Think)
The PSU (Power Supply Unit) converts AC power from the wall into the stable DC power your components need.
It doesn’t add FPS. It doesn’t make your PC faster. But it does one thing that nothing else in your system can: it protects every other component from unstable or excessive power.
A bad PSU can cause:
- Random crashes and shutdowns under load
- Instability that looks like software problems but isn’t
- Physical damage to the GPU, motherboard, or CPU
- Shortened component lifespan
The PSU is the last place to cut corners in a build. A cheap GPU in a quality system is recoverable. A cheap PSU in any system is a fire sale for your hardware.
How Much Wattage Do You Actually Need?
GPU and CPU are the two big draws. Modern GPUs in particular can spike hard.
| Build Type | Example GPU | Recommended PSU |
|---|---|---|
| Budget Gaming | Entry-level GPU (150W) | 550W–650W |
| Midrange Gaming | Mid-range GPU (200W) | 650W–750W |
| High-End Gaming | RTX 5080 / RX 9070 XT class (250–300W) | 850W–1000W |
| Flagship | RTX 5090 / flagship class (450–600W+) | 1000W–1200W+ |
Why headroom matters: Running a PSU constantly at 90–95% of its rated capacity is not ideal. PSUs run more efficiently, cooler, and more quietly at 50–70% load. It also gives you buffer for GPU power spikes (modern high-end GPUs can spike significantly above their rated TDP for brief moments).
A good rule: leave 20–30% headroom above your estimated system draw.
Why massive overkill PSUs are unnecessary: A 1600W PSU in a midrange build does nothing positive for you. Higher wattage doesn’t mean better quality, better efficiency, or better performance. It just means spending more money.
PSU Quality: The Label Doesn’t Tell You Enough
This is where most buyers get fooled. Two PSUs with identical wattage ratings can have wildly different internal quality.
What separates a quality PSU from a dangerous one:
- Capacitor quality: Budget PSUs often use capacitors rated for lower temperatures that degrade faster
- Voltage regulation: How consistently the PSU delivers exactly the right voltage under varying loads
- Protections: Overcurrent, overvoltage, short circuit, overtemperature — quality PSUs have all of these
- Build quality: Real transient load handling, not just peak ratings
Cheap no-name PSUs are one of the most genuinely dangerous components in PC building. They can fail in ways that take other parts with them.
Stick to brands with real testing and review histories. Names like Seasonic, Corsair (HX/RM series), be quiet!, ASUS ROG Thor, and Fractal ION consistently appear in reputable PSU reviews. Check reviews from Tier Lists maintained by PSU communities (like Cultists Network) when in doubt.
80 Plus Efficiency Ratings: Useful but Misunderstood
The 80 Plus certification system rates how efficiently a PSU converts wall power to usable power:
| Rating | Efficiency at 50% Load | Notes |
|---|---|---|
| 80 Plus | 82% | Basic — mostly on older/budget units |
| Bronze | 85% | Fine for budget builds |
| Gold | 90% | The mainstream sweet spot |
| Platinum | 92% | Excellent, worth it for high-use systems |
| Titanium | 94%+ | Top tier, diminishing returns for most |
The critical thing to understand: Efficiency certification is not the same as quality. A PSU can have a Gold rating and be garbage internally. The certification tests efficiency under specific lab conditions, not build quality, transient response, or how long it’ll last.
Gold is the practical minimum to aim for in any serious build. But always verify with actual reviews, not just the badge on the box.
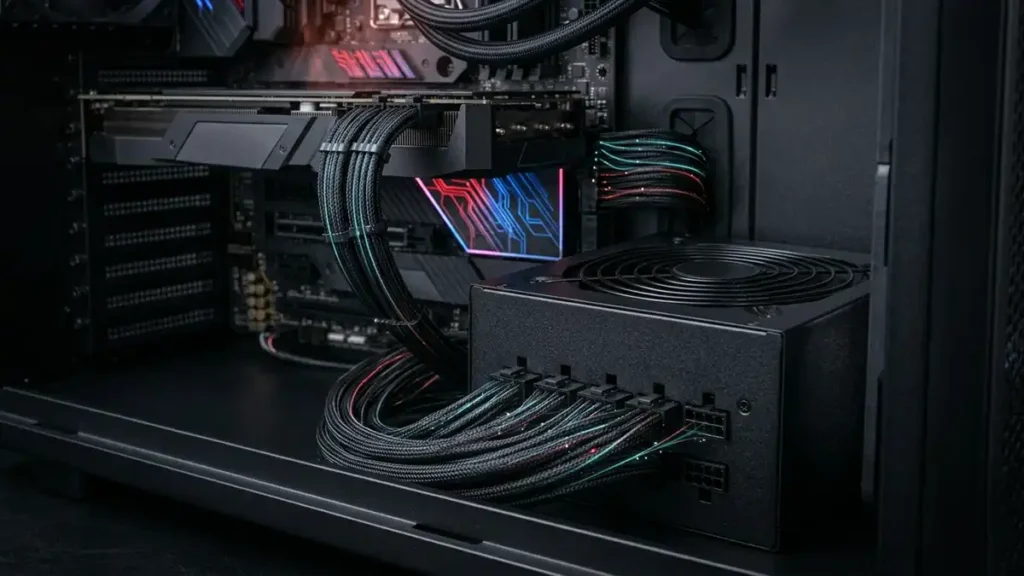
Modular vs Non-Modular: Cleaner Builds, Same Power
| Type | What It Means | Best For |
|---|---|---|
| Fully Modular | All cables detach | Cleanest cable management, easier builds |
| Semi-Modular | Fixed essential cables, rest detach | Balance of cost and convenience |
| Non-Modular | All cables fixed | Budget builds — perfectly functional, messier routing |
Fully modular is worth it in mid-to-high-end builds where cable management and airflow matter. In a budget build, non-modular is completely fine as long as the PSU itself is quality.
Connector Compatibility: Check Before You Buy
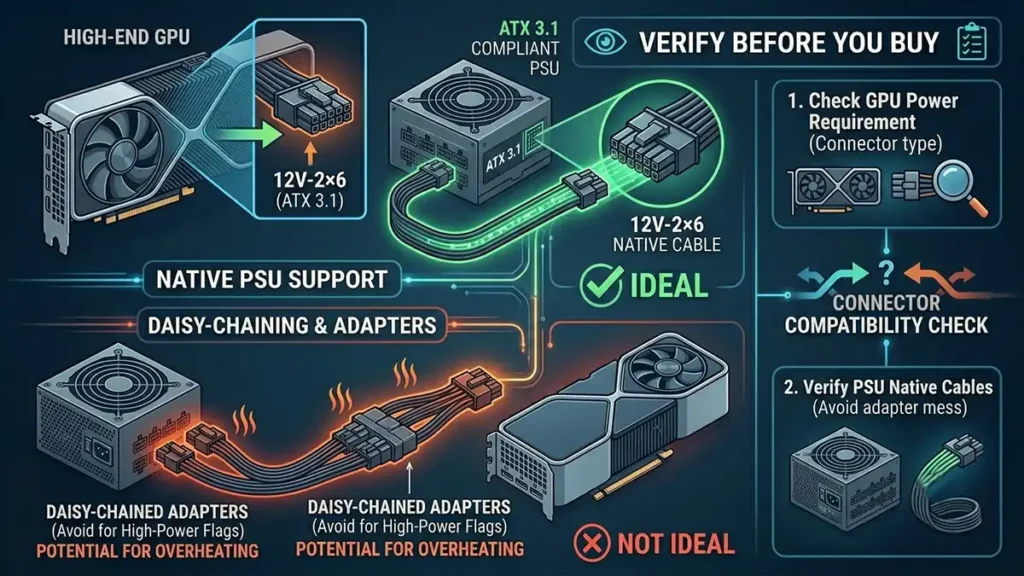
Modern high-end GPUs now use the 12V-2×6 connector (part of the ATX 3.1 spec). If your GPU uses this connector, your PSU should support it natively. Using daisy-chained adapters from older connectors is not ideal for high-power flagship cards.
Always verify your GPU’s connector requirements against what the PSU provides before purchasing either component.
What Gamers Should Prioritize in a PSU
Common PSU Mistakes
Buying a cheap no-name PSU. One of the worst decisions in PC building. Full stop.
Confusing wattage with quality. A 1000W unit from an unreliable brand is worse than a 750W unit from a trusted one.
Insufficient wattage for high-end GPUs. Modern flagship cards can draw far more than their rated TDP during brief spikes. Underpowered PSUs cause crashes under load.
Ignoring connector compatibility. Always check what your GPU actually needs before buying the PSU.
Part 3: Cooling — Performance You’ll Hear (or Won’t)
Why Cooling Is More Than Just “Keeping Things Cold”
Modern CPUs and GPUs boost their clock speeds based on available thermal headroom. When temperatures climb, the hardware backs off performance to protect itself, a process called thermal throttling.
So cooling isn’t just about hardware longevity. It directly affects the performance you’re getting out of your components in real time.
Beyond performance: a poorly cooled system runs loud. Fans spin up aggressively to compensate for heat they can’t manage. Good cooling keeps things cool and quiet simultaneously.
Air Cooling vs Liquid Cooling: The Real Comparison
This is where a lot of unnecessary anxiety lives. Here’s what actually matters:
Air Cooling
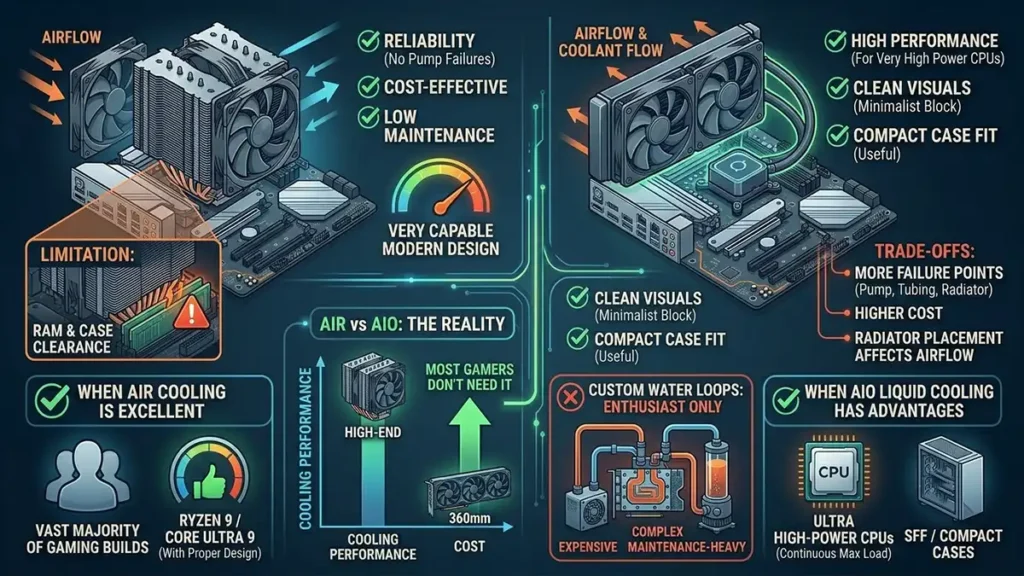
A quality tower air cooler is excellent for the vast majority of gaming builds. Modern large-tower coolers (Noctua NH-D15, be quiet! Dark Rock Pro, Thermalright Phantom Spirit, etc.) can handle even high-end CPUs like the Ryzen 9 or Core Ultra 9 with impressive results.
Air coolers are:
- Highly reliable (no pump to fail, no tubing to leak)
- Cost-effective
- Easier to maintain
- Very capable with modern designs
The main limitation is physical clearance, large tower coolers can interfere with RAM slots or case side panels. Always check cooler height versus your case’s clearance spec.
AIO Liquid Cooling (All-In-One)
AIOs are self-contained liquid cooling systems with a pump, radiator, and hose. They’re not inherently better than good air coolers, but they have specific advantages:
- Better performance for very high-power CPUs
- Cleaner visual look
- Useful in compact cases where tall tower coolers won’t fit
- Can run quieter at the same thermal performance as smaller air coolers
The trade-offs:
- More failure points (pump, tubing, radiator)
- Higher cost for equivalent cooling
- Radiator placement affects case airflow
Custom Water Loops are enthusiast territory; expensive, complex, and maintenance-heavy. Most gamers don’t need them and shouldn’t plan around them.
Radiator Size for AIOs
| Radiator Size | Best For | Notes |
|---|---|---|
| 240mm | Mid-range CPUs in tight cases | Adequate but limited headroom |
| 280mm | Mid to high-end CPUs | Sweet spot for many builds |
| 360mm | High-end and flagship CPUs | Best performance, needs a compatible case |
Bigger radiators generally mean lower temperatures and quieter fans at the same cooling load. If your case supports 360mm and you’re running a hot CPU, it’s worth the upgrade.
Cooler Clearance: Measure Before You Buy
This applies to both air coolers and AIOs.
For tower coolers:
- Check the cooler’s height (in mm) against your case’s max CPU cooler height
- Check that the cooler doesn’t overhang RAM slots if you have tall heatspreader memory
For AIOs:
- Confirm your case supports the radiator size (240/280/360mm) in your preferred mounting position (top, front, or side)
- Check that the pump head and tubes reach from the radiator to the CPU socket
Getting this wrong means either returning something or forcing a part to barely fit.
CPU Cooling: Stock vs Aftermarket
Some CPUs include a stock cooler in the box. Whether it’s actually good enough depends on the CPU.
| Situation | What to Do |
|---|---|
| Budget or low-TDP CPU (65W and below) | Stock cooler is usually adequate |
| Mid-to-high-end CPU (105W+) | Aftermarket cooler is strongly recommended |
| High-performance CPU (Ryzen 9, Core Ultra 9) | Quality aftermarket is effectively required |
Stock coolers on high-power chips can run hot and loud. The CPU may throttle under sustained gaming or streaming loads. An aftermarket cooler in the $40–$80 range makes a meaningful difference in both temperature and noise.
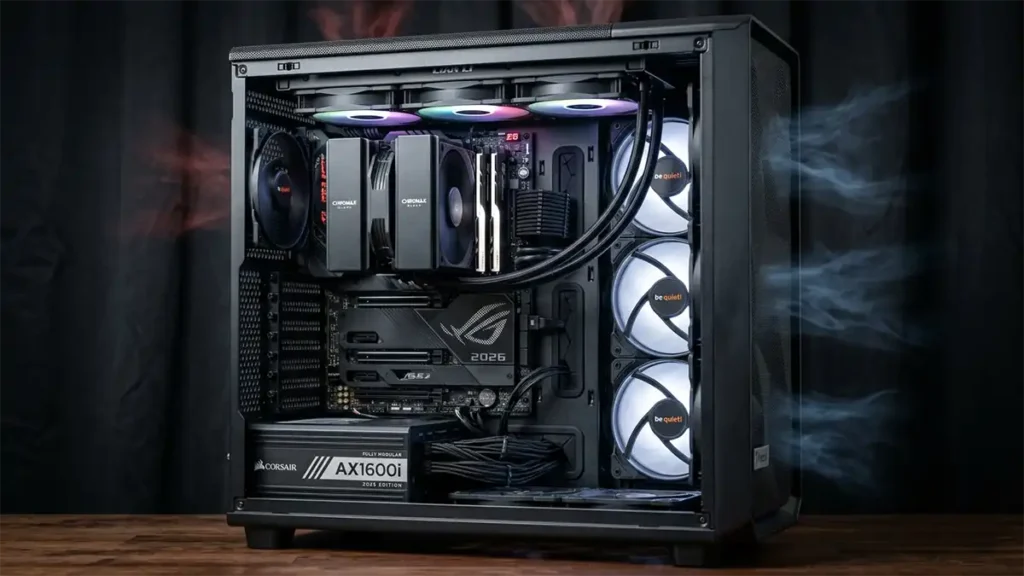
Part 4: Cases — Airflow First, Looks Second
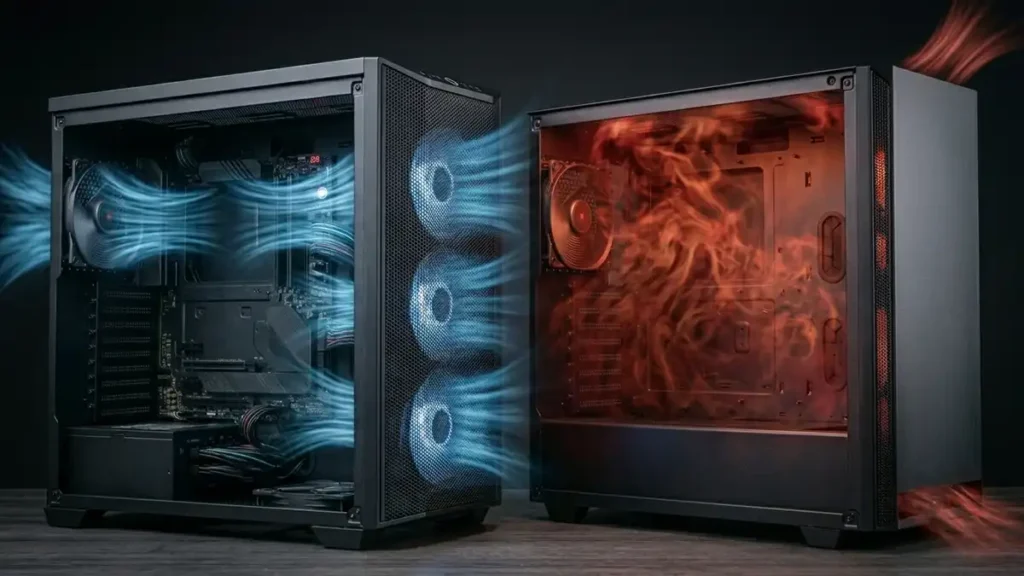
The Single Most Important Thing About Cases
Airflow.
A beautiful case with a solid front panel and no mesh is one of the most common ways gamers hurt their own system performance. The GPU which dumps enormous heat, depends on fresh air circulating through the case. Restrict that airflow with a solid decorative front panel, and GPU temperatures climb, fans screech, and performance drops.
It sounds dramatic. It’s not. Case airflow is measurably, meaningfully different across designs.
How Case Airflow Works
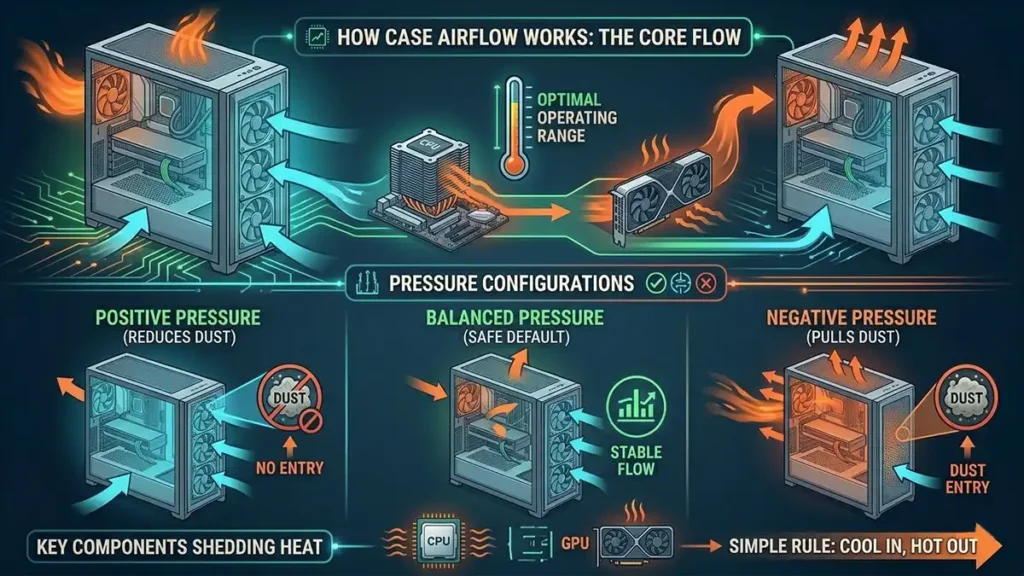
The goal is simple: move cool air in, move hot air out. Most healthy gaming builds use a positive or balanced pressure setup:
- Intake fans pull cool air into the case, typically at the front and/or bottom
- Exhaust fans push hot air out, typically at the rear and top
The GPU and CPU sit in the path of this airflow, shedding heat as air moves past.
Positive pressure (more intake than exhaust) slightly reduces dust buildup by creating outward pressure at case gaps.
Negative pressure (more exhaust than intake) can pull dust in through unfiltered gaps.
Balanced pressure is the safe default for most builds.
Mesh Front Panels vs Solid Front Panels
| Type | Airflow | Noise | Notes |
|---|---|---|---|
| Mesh front | Excellent | Slightly more audible | Best thermal performance |
| Solid / tempered glass front | Restricted | Quieter (fans don’t need to work as hard) | GPU temperatures run hotter |
This is a genuine trade-off. Mesh fronts run cooler. Solid fronts look cleaner and muffle sound slightly. For most gaming builds where thermal performance matters, mesh front cases are the better choice. The temperature difference can be 5–10°C on the GPU in the same fan configuration.
Popular mesh-front cases in 2026 that have earned good reputations: Fractal Meshify series, Lian Li Lancool series, be quiet! Pure Base 500DX, Corsair 4000D Airflow.
GPU Clearance: Modern Cards Are Huge
High-end GPUs in 2026 can be:
- Over 330–340mm long (longer than some older cases support)
- 3+ slots thick (can block adjacent PCIe slots or RAM)
- Physically heavy (requiring GPU support brackets in some cases)
Before buying a case, verify its maximum GPU length against the card you’re planning to install. This catches problems before they happen.
Also check whether a 3-slot GPU will obstruct anything important in your case, some airflow designs don’t work well with very thick cards.
Fans: Size, Type, and Placement
Bigger fans spin slower for the same airflow. A 140mm fan moving the same air as a 120mm fan does it at lower RPM, which means less noise. When your case and budget allow, opt for 140mm fans over 120mm.
Fan types:
| Type | Best For |
|---|---|
| Airflow fans | Open areas — front intakes, top/rear exhausts |
| Static pressure fans | Radiators, dust filter panels, restrictive areas |
PWM vs DC fans: PWM fans adjust speed based on temperature signals from the motherboard, keeping them quiet at idle and ramping up only under load. All modern quality fans support PWM.
More fans isn’t always better. Poorly placed fans can create conflicting airflow that actually hurts temperatures. Placement and direction matter more than raw fan count.
Dust Filters and Maintenance
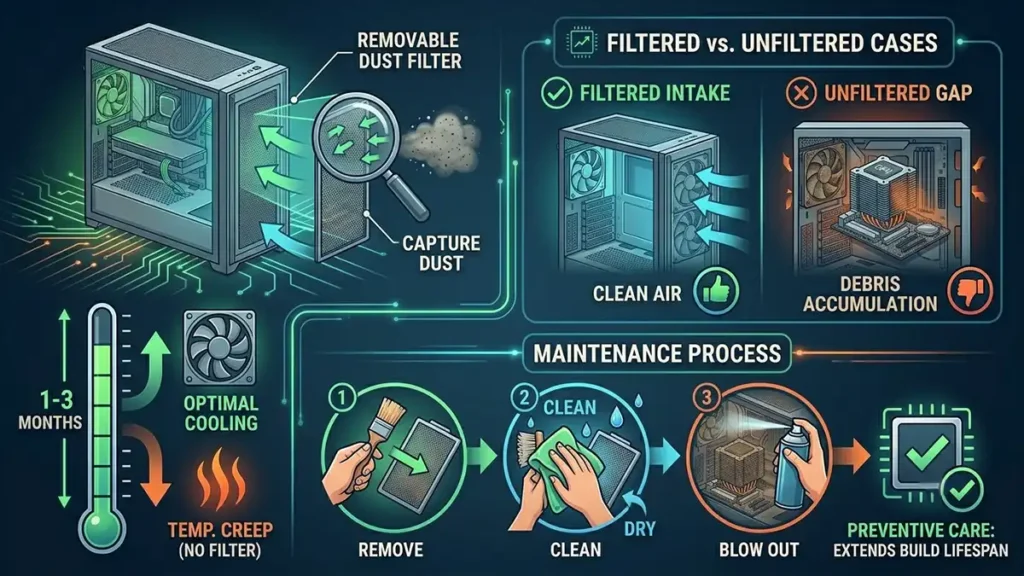
Dust accumulates regardless of airflow quality. It acts as insulation, raising temperatures over time.
Good cases include removable dust filters on intakes. Clean them every 1–3 months depending on your environment. This alone can prevent significant temperature creep over the lifespan of a build.
Cases without dust filters are harder to maintain and accumulate debris faster.
What Gamers Should Prioritize in a Case
Common Case and Cooling Mistakes
Buying a beautiful case with terrible airflow. Happens constantly. Always check airflow reviews, not just aesthetics.
Underestimating GPU heat. Modern flagship GPUs dump enormous heat into a case. They are not like GPUs from five years ago.
Ignoring cooler clearance. A large tower cooler or 360mm AIO may not fit your case. Always verify dimensions before ordering.
Random fan placement. Placing fans without thinking about intake and exhaust direction can create turbulence and dead spots.
Vertical GPU mounting without checking temperatures. Vertical mounting can look great but raise GPU temperatures by several degrees in cases where the card sits close to the side panel. Check benchmarks for your specific case first.
Putting It All Together: Budget Tier Recommendations
| Build Tier | Motherboard | PSU | Cooling | Case |
|---|---|---|---|---|
| Budget Gaming | Midrange chipset, AM5 or LGA1851 | 650W Gold, reputable brand | Aftermarket air cooler or AIO for hot CPUs | Airflow-focused mid tower |
| Midrange Gaming | Solid midrange chipset, good VRMs, 2+ M.2 | 750W–850W Gold, fully modular | Quality 240–280mm AIO or large air cooler | Mesh-front mid tower with room for fans |
| High-End Gaming | Upper midrange to enthusiast chipset | 850W–1000W Gold/Platinum | 280–360mm AIO or top-tier air cooler | Full mid tower with excellent airflow |
| Flagship Build | Enthusiast chipset, strong VRMs | 1000W+ Platinum | 360mm AIO minimum | Full mid or full tower, verified GPU clearance |
Motherboards, PSUs, Cooling & Cases Guide: FAQ ❓
650W–750W from a quality brand comfortably handles most midrange builds in 2026. If you’re running an upper midrange GPU like an RX 9070 XT or RTX 5070, 750W–850W gives you the headroom you want. Always verify the specific power draw of your GPU and CPU together.
No. Many excellent builds run on air coolers. Large tower air coolers from Noctua, Thermalright, be quiet!, and similar brands can handle even high-end CPUs effectively. AIOs are worth it for specific scenarios: compact cases that won’t fit a tower cooler, very high-power CPUs that benefit from the larger radiator surface area, or noise targets that a large AIO handles better at low fan speed.
Yes. Cheap PSUs with poor voltage regulation, undersized components, or missing protections can deliver unstable power that causes crashes, degrades components over time, or fails in ways that damage connected hardware. This is not hypothetical. Buy from brands with real reviews and testing history.
GameMonkey Verdict
Get the FPS you paid for
These components don’t add FPS directly. They determine whether you actually get the FPS you paid for.
The GPU and CPU set the performance ceiling. The motherboard, PSU, cooling, and case determine whether you ever reach it, and whether your hardware survives long enough to matter.
The smart approach is simple:
- Motherboard: Match your CPU, get decent VRMs, don’t overspend on features you won’t use
- PSU: Buy from a proven brand, get enough wattage with headroom, don’t confuse efficiency ratings with build quality
- Cooling: Airflow first; air coolers are underrated, AIOs are useful but not magic
- Case: Mesh front, verify clearance, pick airflow over aesthetics
A gaming PC built on a solid platform runs cooler, quieter, more stably, and lasts longer. That’s not exciting marketing language. It’s just what separates a smart build from an expensive mistake.