How to Fix Stick Drift: Cleaning, Calibration, Hall Effect & TMR Solutions
Every gamer knows the frustration. You’re lining up a perfect headshot, feathering a turn in a racing game, or balancing on a narrow ledge when your character suddenly starts moving on its own. No input. No warning. Just drift. Finding reliable stick drift solutions becomes a priority when your controller begins to ruin otherwise perfect gameplay moments.
Controller stick drift is one of the most common hardware failures in modern gaming, affecting controllers like the DualSense Wireless Controller, the Xbox Wireless Controller, and the Nintendo Switch Joy-Con. As controllers become more expensive, even minor drift can quickly degrade your gameplay experience. This guide explores the most effective stick drift solutions, explains why the problem happens, and shows which fixes from software deadzone adjustments to modern Hall Effect and TMR magnetic sensors actually work.
Stick Drift Symptoms: Is This You?
You might have stick drift if you notice any of the following:
- Your character moves on its own without touching the stick
- Camera drifts or pans slowly by itself
- Menu cursors shift when idle
- Drift gets worse over time
- L3 feels loose or “crunchy”
If you see one or more of these signs, this guide will help you fix stick drift and upgrade your controller with Hall Effect or TMR sensors.
Stick Drift Solutions: Quick Fix Overview
| Solution | Best For | Difficulty | Longevity |
|---|---|---|---|
| Calibration & Deadzones | Minor centering errors | Easy (Software) | Short-term |
| Physical Cleaning | Dust or grime buildup | Easy | Variable |
| Potentiometer Replacement | Keeping controller stock | Hard (Soldering) | 6–12 Months |
| Hall Effect Sticks | Most gamers | Hard (Modding) | Years |
| TMR Sticks | Competitive / Precision users | Hard (Modding) | Years |
How to Confirm You Actually Have Stick Drift

Before opening your hardware, confirm the issue isn’t a temporary software glitch.
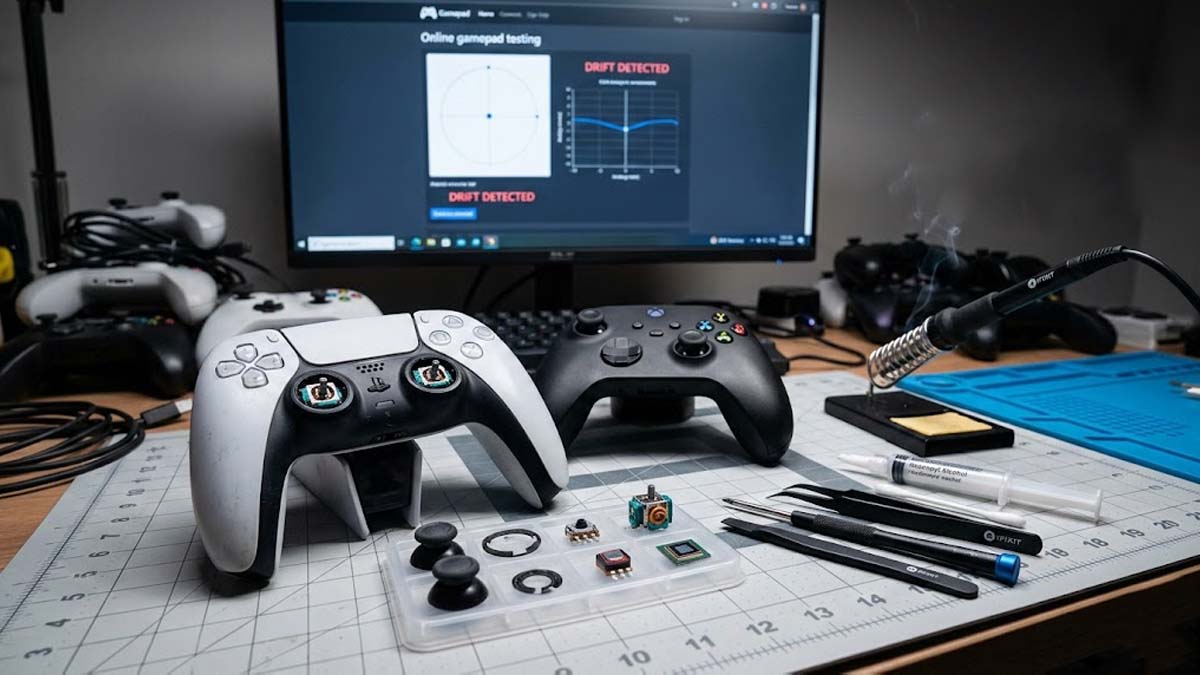
Testing on PC
Tools like Windows Game Controller settings, Steam Input calibration, or online gamepad testers (like Gamepad-Tester.com) show real-time analog input. If the stick registers movement while untouched especially near the center you’re dealing with hardware drift.
Testing on Consoles (PS5, Xbox, Switch)
Most systems offer built-in calibration in the settings menu. However, games themselves are often the best test. Watch the camera or menu cursor for unwanted movement.
Rule out these common issues first:
- Overly aggressive deadzone settings in specific games.
- Worn or loose thumbstick caps causing a weight imbalance.
- Bluetooth interference from other devices.
True stick drift is consistent, measurable, and worsens over time.
What Causes Stick Drift in Gaming Controllers

Stick drift is rarely a software bug; it’s almost always a mechanical failure of the Potentiometer.
Inside most joysticks is a resistive carbon track and a metal wiper. As you move the stick, the wiper rubs against the track to read voltage. Over time, this leads to:
- Physical Wear: The wiper literally scrapes away the carbon, changing the resistance.
- Debris Buildup: Microscopic plastic dust and skin cells get trapped inside, disrupting the electrical signal.
- Oxidation: Once the seal is compromised, the metal wiper and copper traces can oxidize, especially in humid enviroments.
These issues destabilize voltage readings, which the controller interprets as movement.
The left stick usually fails first because it’s used constantly for movement and often pressed in (L3) to sprint, accelerating wear.
Level 1: Quick Fixes (Software & Maintenance)
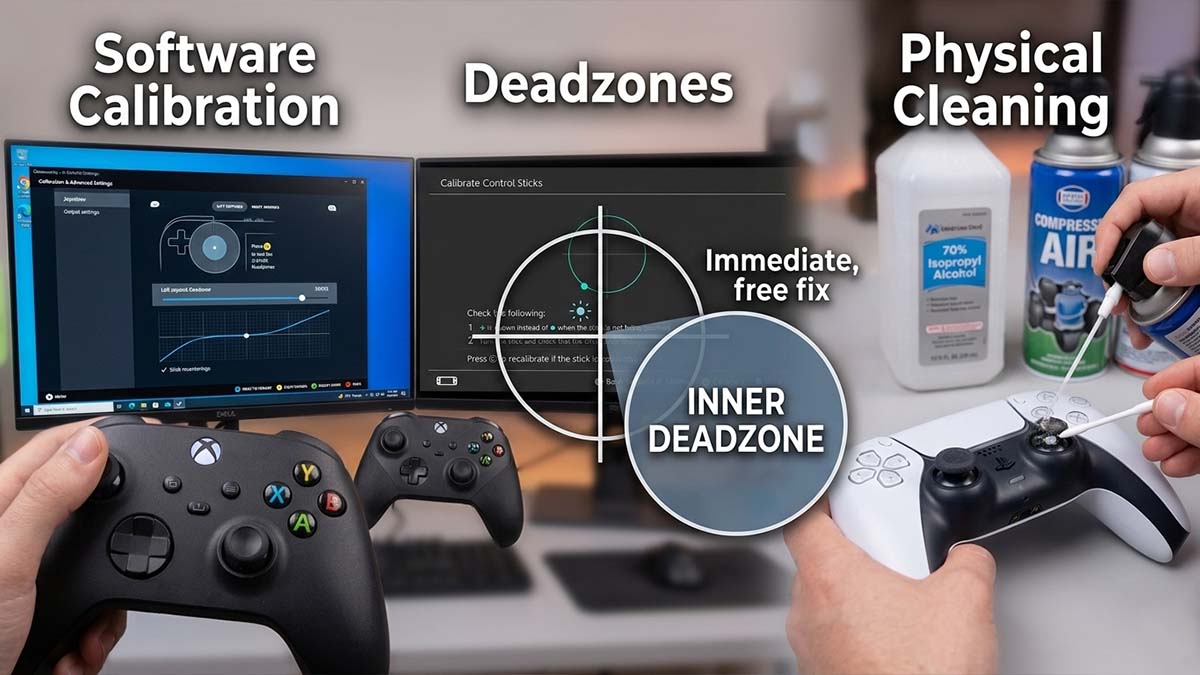
Software Calibration to Fix Stick Drift
Sometimes the hardware is still functional, but the controller’s idea of “center” has shifted.
- PC: Use Steam’s “Calibration and Advanced Settings” to manually re-center the stick.
- Switch: Use the “Calibrate Control Sticks” option in System Settings.
Using Deadzones as a Stick Drift Solution
A deadzone is a “blind spot” where the game ignores input. If your drift is minor, increasing the Inner Deadzone can hide the movement.
- Pros: Immediate, free fix.
- Cons: Reduces aiming precision and makes the controller feel “sluggish.”
Cleaning Your Controller to Fix Stick Drift
If drift is caused by grime, a deep clean can help.
- Tools: Compressed air and 70%+ Isopropyl Alcohol.
- Process: Use air to blow out debris, then apply a tiny amount of alcohol to the ball-joint base while rotating the stick.
⚠️ Pro-Tip for Repairs
Modifying hardware carries risks. Opening your device usually voids your warranty. We recommend this fix only if your warranty has already expired or you are comfortable with DIY repairs. Gamemonkey provides these guides for educational purposes only.
Level 2: Potentiometer Replacement (Keeping It Stock)
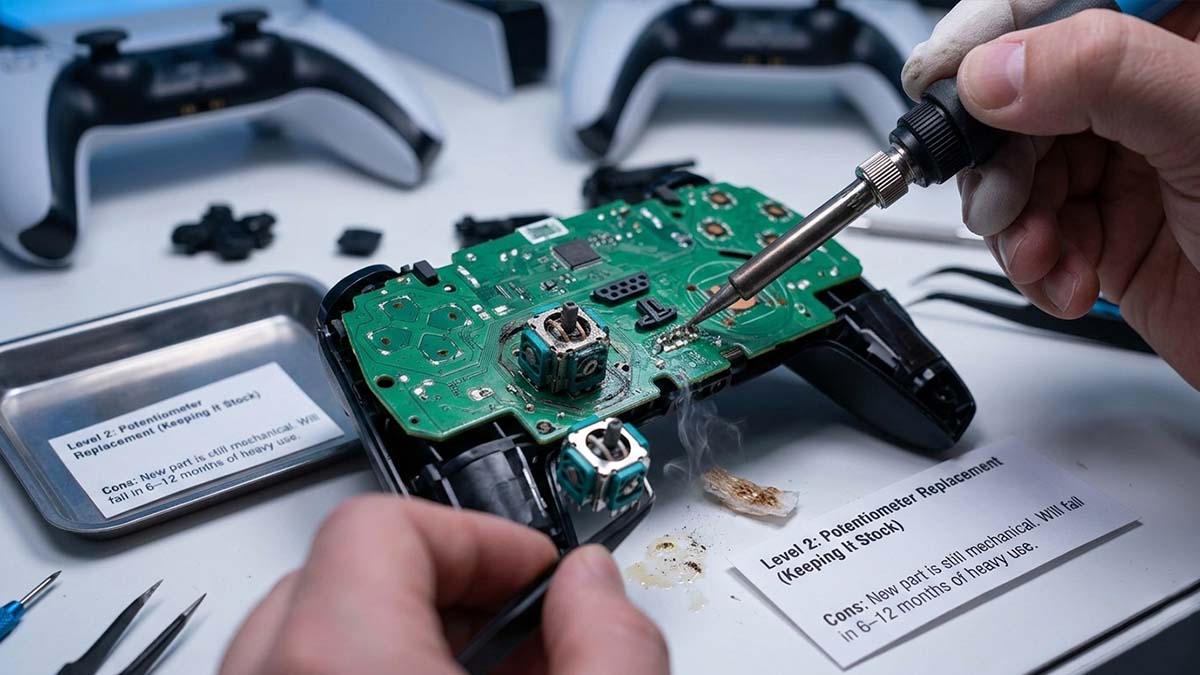
If cleaning fails, the carbon track is likely physically worn out. Repair shops typically desolder the old unit and replace it with a new one.
- Pros: Restores the “out-of-the-box” factory feel.
- Cons: The new part is still mechanical. It will eventually fail again (usually within 6–12 months of heavy use).
Level 3: Hall Effect Joysticks

Hall Effect joysticks have become the gold standard for gamers who want to buy a controller once and never worry again.
How Hall Effect Sensors Prevent Stick Drift
Instead of a wiper rubbing a track, Hall Effect sensors use magnets. A sensor measures the magnetic field as the stick moves. Since there is no physical contact, there is no friction to wear down the parts.
- Longevity: Can last for years without developing drift.
- Centering: Extremely stable “Return-to-Center” performance.
Level 4: TMR Joysticks (The Cutting Edge)
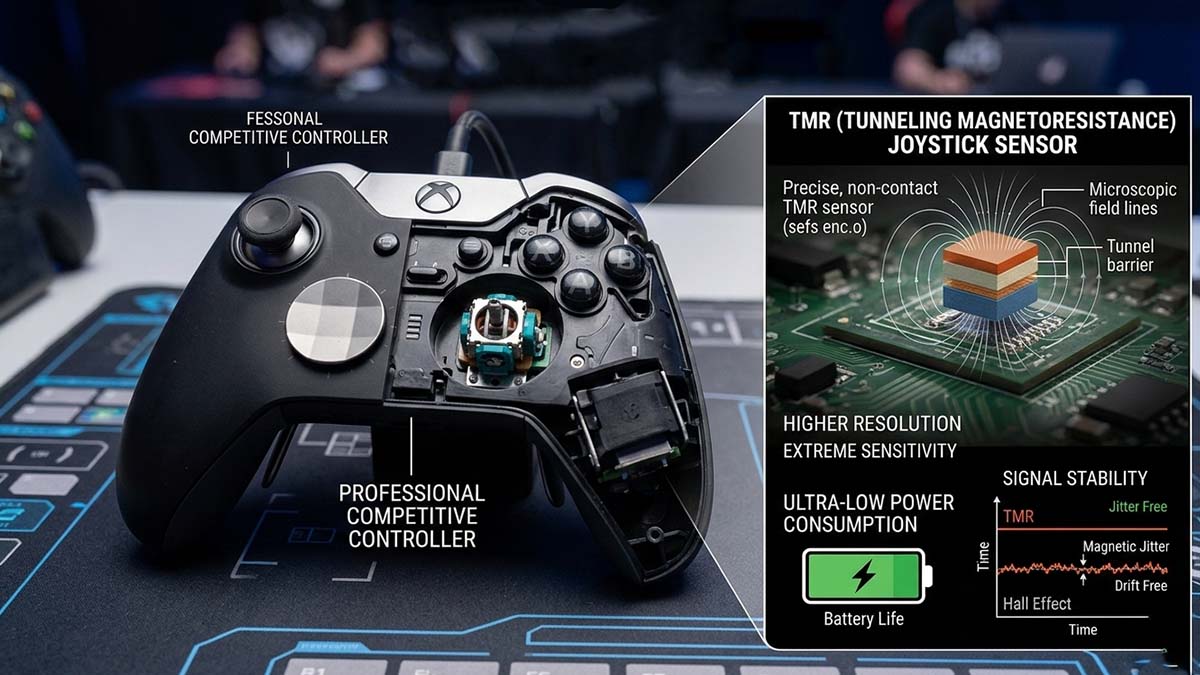
Tunneling Magnetoresistance (TMR) is the newest evolution in magnetic sensing, currently found in high-end enthusiast controllers.
Why TMR Is the Most Advanced Stick Drift Solution
While Hall Effect is great, TMR offers even higher resolution and sensitivity.
- Power Consumption: TMR uses significantly less power, extending battery life in wireless controllers.
- Signal Stability: TMR is less susceptible to “magnetic jitter,” making it the choice for professional competitive players who need absolute precision.
Comparing Stick Drift Solutions: Potentiometer vs Hall Effect vs TMR
| Feature | Potentiometer | Hall Effect | TMR |
|---|---|---|---|
| Drift Resistance | Low | Very High | Extremely High |
| Mechanical Wear | Yes | No | No |
| Precision | Good | Very Good | Excellent |
| Cost | Low | Medium | High |
| Expected Lifespan | 6–12 Months | 5+ Years | 5+ Years |
Stick Drift Solutions for PS5, Xbox, and Switch Controllers
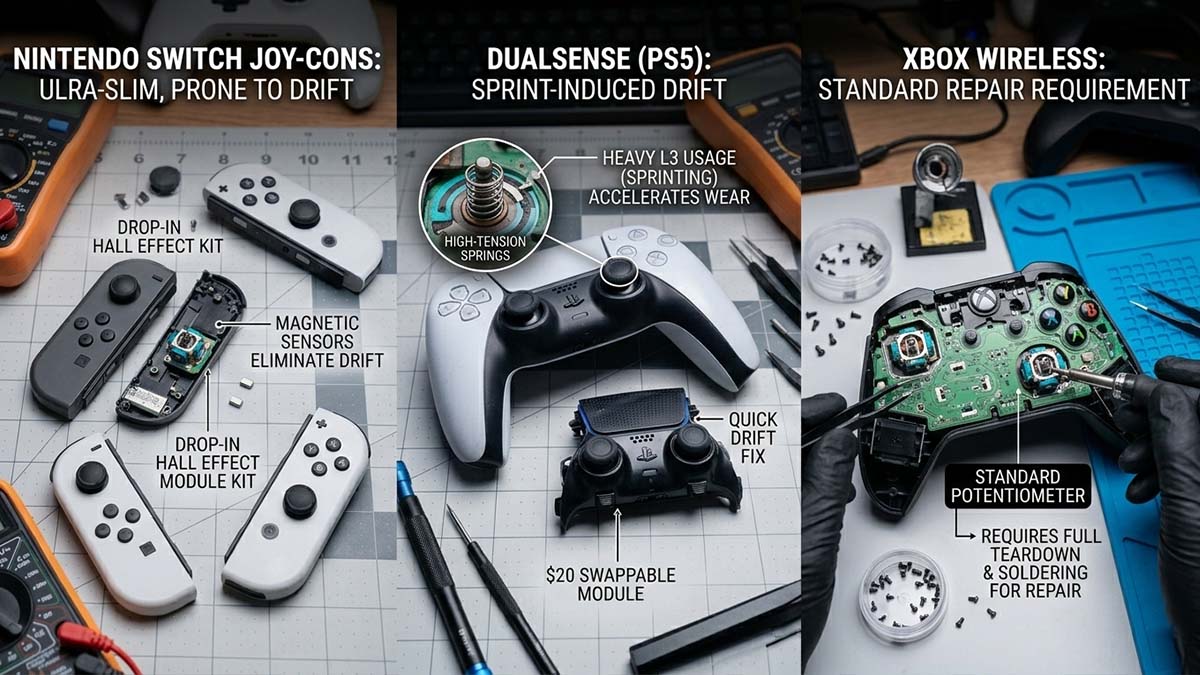
Nintendo Joy-Cons: The most prone to drift due to their ultra-slim design. Many users prefer “drop-in” Hall Effect replacement kits.
DualSense (PS5): Uses high-tension springs. Drift often manifests after heavy L3 (sprinting) usage. The DualSense Edge is unique because you can swap the entire stick module for $20.
Xbox Wireless: Uses standard potentiometers. Most repairs require a full teardown and soldering.
Pro Tips: PS5 & Xbox Stick Drift Secret
Best Stick Drift Solutions for Different Types of Gamers
- The Casual Player: Stick to calibration and cleaning.
- The Daily Gamer: Upgrade to a Hall Effect controller (like the 8BitDo Ultimate or Mobapad).
- The Pro Competitor: Look into TMR upgrades for the highest possible polling rates and precision.
Stick drift isn’t inevitable—it’s a choice. By understanding the tech under the hood, you can stop fighting your controller and start fighting your opponents.
❓FAQ: Stick Drift Solutions
No. Never use standard WD-40; it is a lubricant that can attract more dust. Only use WD-40 Specialist Contact Cleaner, which is designed for electronics and evaporates quickly.
Yes, usually for the first 12 months. Sony, Microsoft, and Nintendo have all faced class-action lawsuits over drift, so check their official support pages before attempting a DIY repair.
You can slow it down by avoiding excessive pressure on L3/R3 and using thumbstick caps to prevent skin oils and debris from falling into the mechanism.
The Post-Repair Checklist
Still didn’t work?
Text: “If cleaning and software fixes failed, your hardware is physically worn. It’s time to stop fighting the symptoms and upgrade to Hall Effect sensors.”
“Note: As an associate, we earn from qualifying purchases made through our links. Thanks for the support!”